
Taping Out Diamonds
I will be posting about actual jobs soon, but today I'm helping out a friend, who recently asked me about taping out diamonds. I've described the process to him a couple of times, but he still seems a bit fuzzy on it, and asked me to draw a picture and mail it to him. Even better, I've decided to make a sample and take pictures of the process.
First I'd like to say that I can't take credit for this method; it was taught to me years ago by Carol Kemory at The Finishing School. There are other ways to make diamonds which may seem like less work, but don't be fooled because your eye will not be; this is the only way I know of to keep your lines continuous.
Layout is crucial. Whenever you tape out diamonds, or even stripes, consider the focal point and measurements of your space carefully. It might be important to center the design in a certain spot, or to have whole diamonds along one edge. On this sample I will be placing the tips of my diamonds along the top edge. I am centering the design to leave relatively even partial diamonds along the sides.
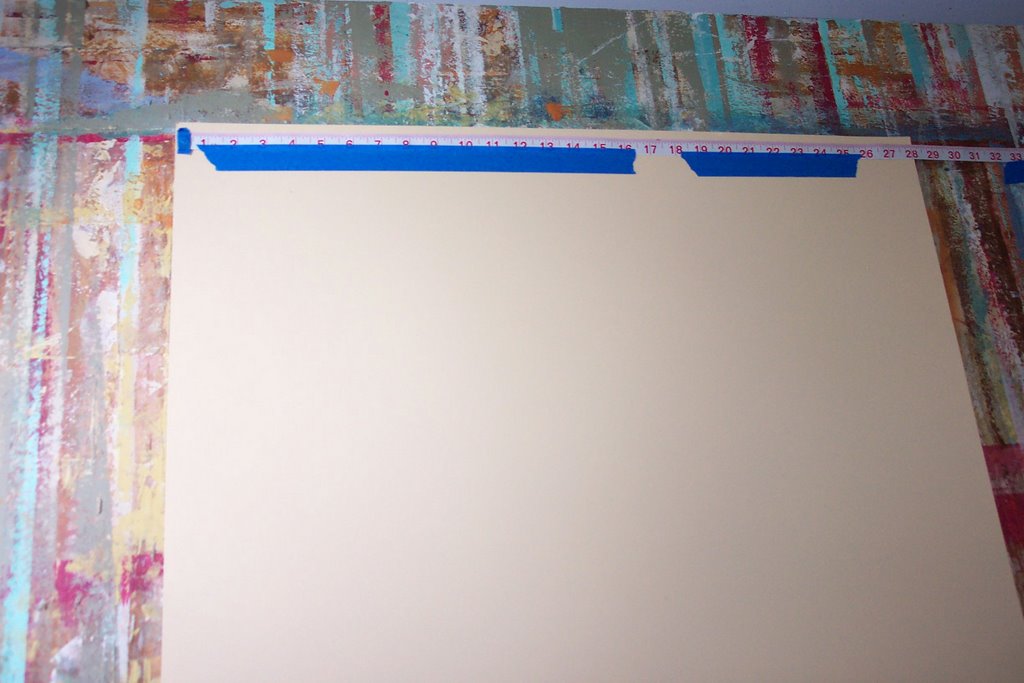
I like to measure using a sewing tape, as it is lightweight enough to tape to your surface while marking your measurements. If you do this, be sure to tape the metal gromets on either end so they will not leave metal-marks. I've found it easiest to mark with chalk, since dots of it disappear quite effortlessly in comparison to pencil. Some people snap chalk-lines, I understand, but I would not unless you are working outside on concrete or something. (In which case I recommend you hose it all off after snapping; the mark will remain but the chalk can't get in your paint this way.) Back in the day when I worked for my aunt, we snapped lines on a floor and I swear I must have washed it six or seven times and never felt like I completely got all the blue off before topcoating... so now I won't touch the stuff.

I've marked the tips of the top diamonds (6" width) and now I'm marking the tip points (9" length) in each column. On a wall I would hang a plumb-line but on floors and samples we have to measure the width. If you are working on a floor with irregularities, however, I recommend you pull a string across the whole floor for each row so you can ensure that it appears as straight as it actually is.
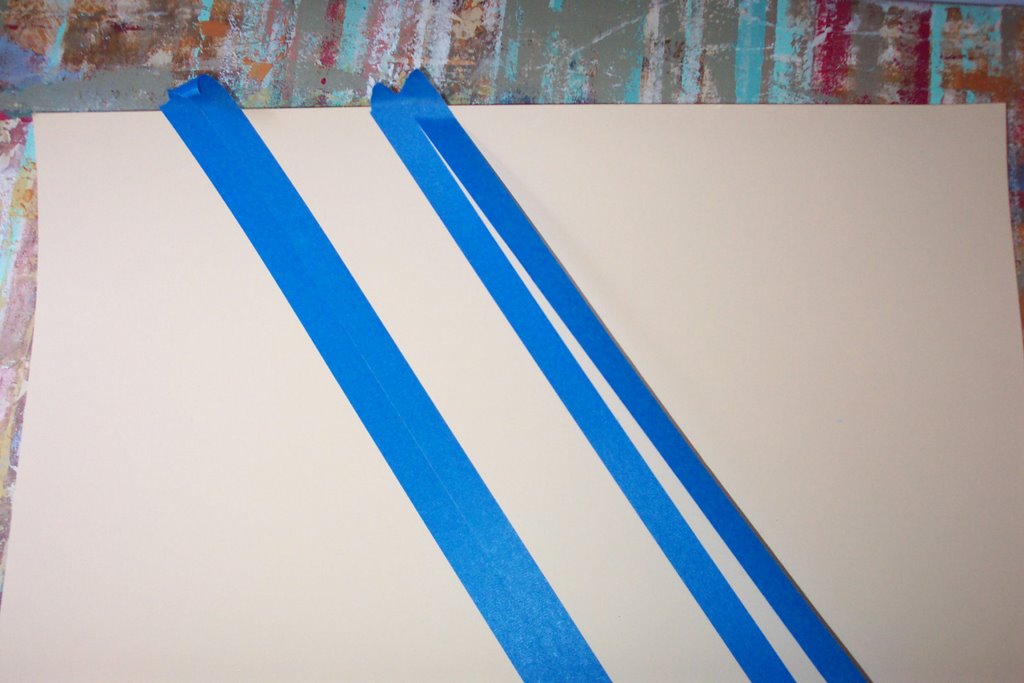
Once you have marked where all the tips meet, you can begin to lay the tape, connecting the dots on the angle of your desired diamonds. Once you've placed tape along one side of the dots, carefully parallel another piece of tape right next to it. Before you do that, though, be sure to mark all the dots on the first piece of tape - you will need to see them later, and the second piece will cover them up! Lay out all the lines in one direction before laying them in the other direction.
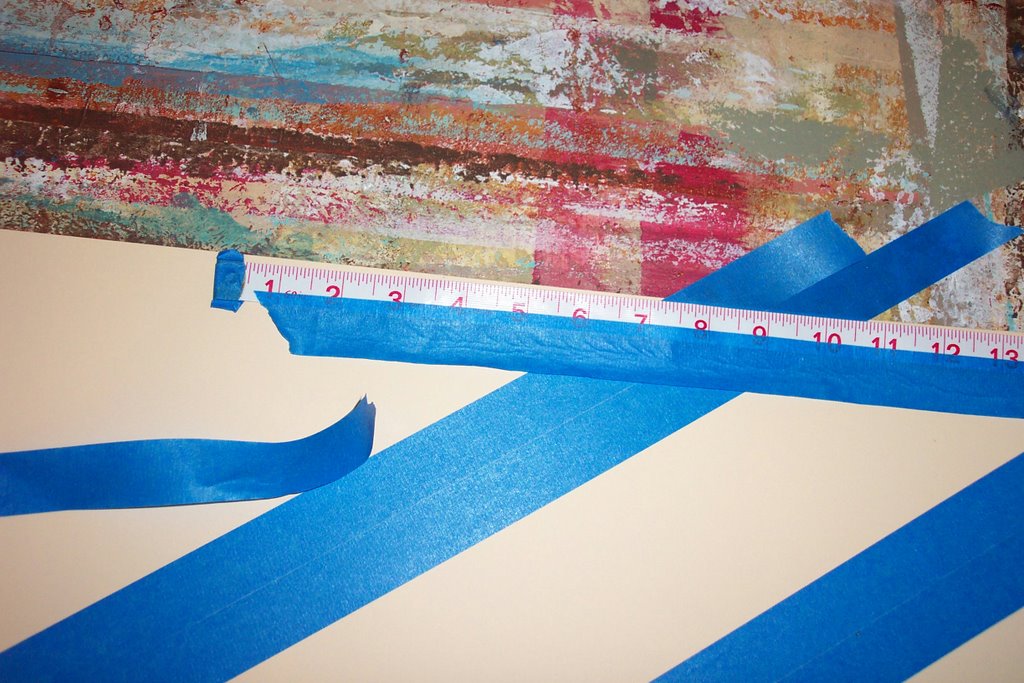
At the edges of your space, you will find yourself with only one dot to draw a line from, and sometimes not even that! Here I am measuring nine inches from the center line of the next set of tape to give myself another dot. The important thing, when you do this, is make sure you are measuring a plumb-vertical line (or horizontal when you are using the width to find the dot). You don't need to mark this dot on the tape.
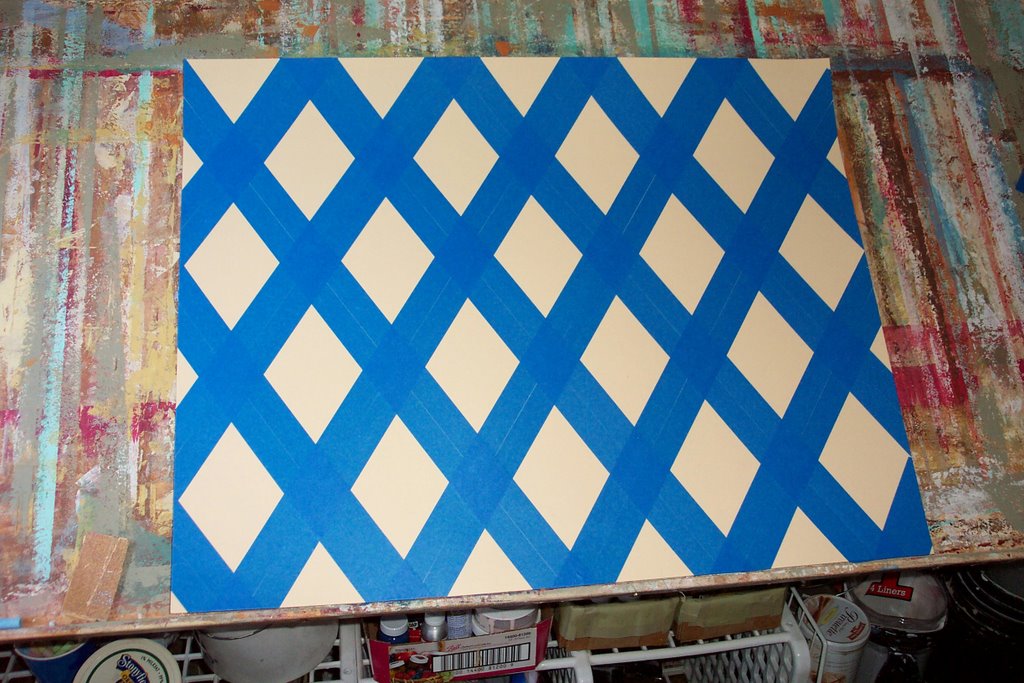
Tape in the other direction by connecting the dots again, and of course laying a parallel piece. When you finish the taping, your space should resemble lattice.
At this point I'd like to note that for teaching purposes on this sample, I'm creating diamonds that would be too small (in practicality) to do on an actual wall or floorspace. I'm trying to get many diamonds on a standard sheet of posterboard so you have an idea of what your actual project space would look like. Also, because of the small size, I'm using 1" tape rather than the 1.5" or 2" tape I would use on the job. Finally, It's very important that you use a tape for delicate surfaces and that you ensure the middle edges are stuck firmly to your surface for no leakage.
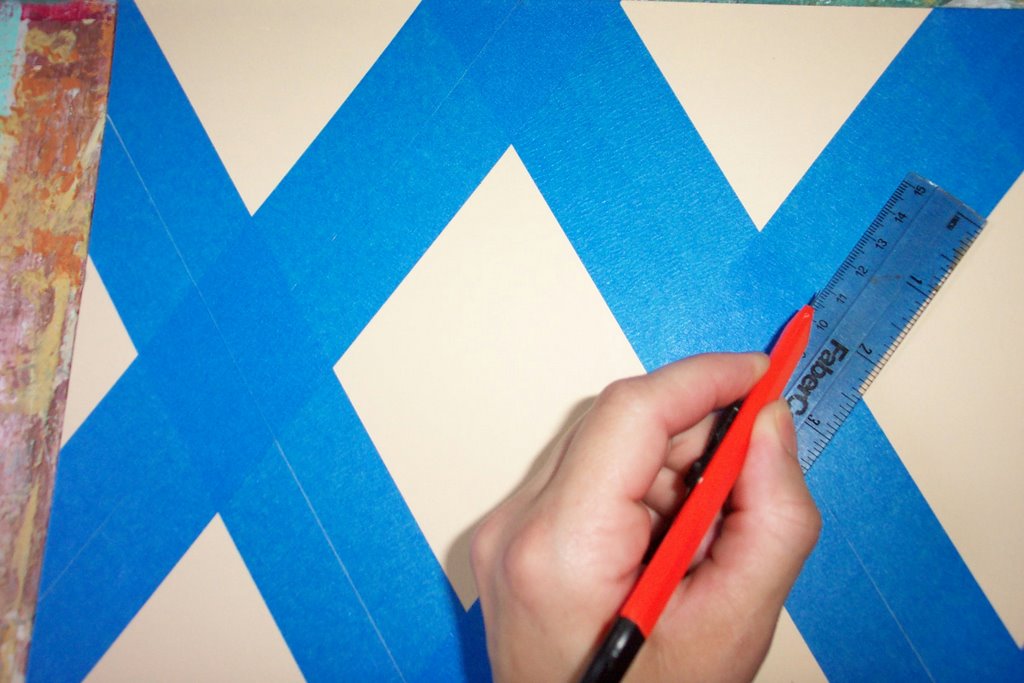
Using a straightedge, cut the middle of each line to create an X wherever the tape crosses.

Remove the tape pieces along the inside of the diamonds you wish to paint. Use the extra pieces of tape to mask the inside of the diamonds you are leaving the base color.
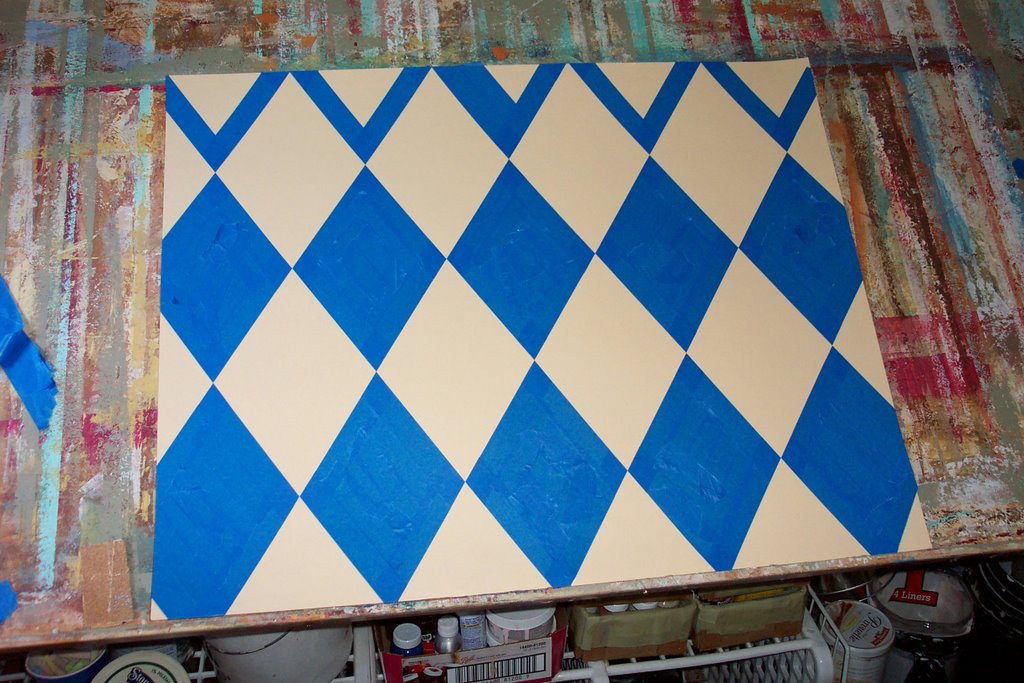
Voila! This is what your surface should look like when you are finally ready to paint. Or is it? Look carefully. See anything wrong? One piece of tape still needs to be removed in the lower left corner. Before your paint, always stand back and take a careful look; after all that work, you want it to be perfect, right?
Even though it's a very simple process, it's not easy to describe. Feel free to ask about anything you don't understand in the comment thread.
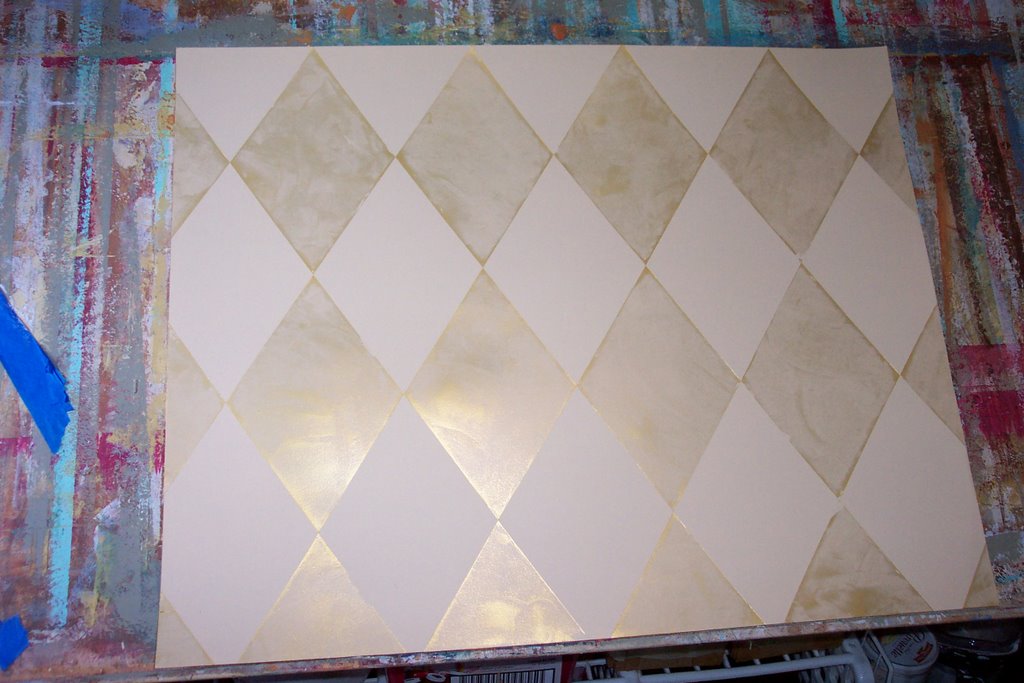
Update: I trowelled a thin layer of gold palette deco (Faux Effect proprietary product; see aforementioned school) into the diamonds and removed the tape. Afterwards I colorwashed the sample with a creamy taupe glaze.
I did this sample just to explain the process, and didn't expect to get much use out of it. Turns out I rather like it. Below you see it taped to a wall at the entrance of my home, where I am considering re-creating it (with slightly larger diamonds, of course) as an accent wall. Right now it's sitting in the master bedroom of a client so she can consider this coloring for her walls (we would probably pick out an allover damask stencil rather than use the harlequin pattern).

posted by Rebecca @ 6:53 PM
5 comments
![]()